

Replacement of the power antenna mast on all G3 Integras. (94-01, 3DR or 4DR with POWER antennas) This was performed on Furious94LS' 4-Door GSR, but will apply to all G3 Integras.
- Tools Required:
- 10mm Wrench
- Philips Head Screwdriver
- Pliers
- Antenna Mast From Honda/Acura (39152-SM4-A03)
The problem... car off, antenna up.
![Image]()
Start by removing the clips that hold on the interior lining and bending/moving the interior trim out of the way to exopse the antenna motor assembly. (on 3DR models it is required that you remove the entire left side interior to obtain easier access to the motor assembly. refer to the rear seat removal article. This project can be done without removing the rear seats but its much easier when everything is out of the way).
![Image]()
![Image]()
Remove the antenna cap nut and black base from the car using the pliers in a counter-clockwise direction.
![Image]()
![Image]()
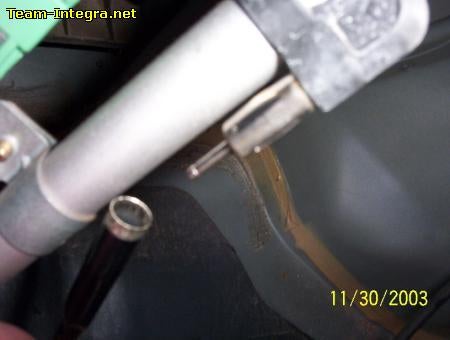
Loosen up the 10mm nut that holds the antenna assy to the bracket. Then slide the antenna down and maneuver it out of the bracket into the trunk area. At this time disconnect the power supply connector, breather tube and antenna reception feed wire.
![Image]()
![Image]()
![Image]()
With the entire unit out of the car, put it on the ground with the metal plate with the two screws facing up.
![Image]()
Remove the two screws to expose the antenna mast reel channel.
![Image]()
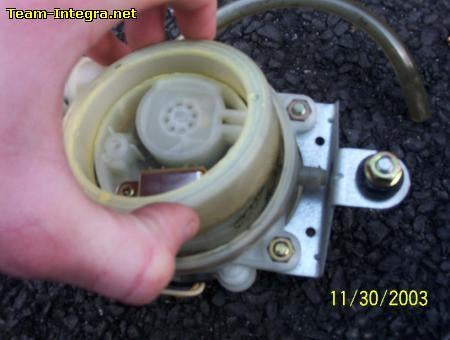
Simply lift, or pry depending on the situation, the plastic channel from the motor assembly and remove the snapped/ damaged/ broken reel.
![Image]()
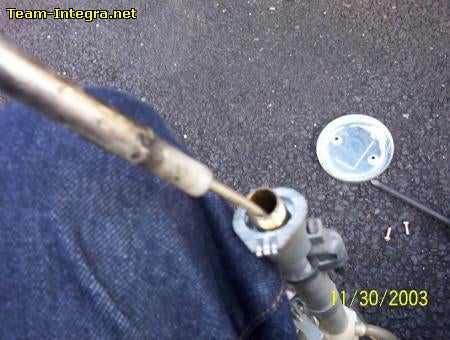
Now go back to the mast and firmly pull it out of the reception tube. (note: If after a few tugs the mast is not comming out you will need a new reception tube as well. Chances are that it is so corroded that the tube has fused itself to the metal of the mast itself! Its not a bad idea to pick up the replacement mast along with the tube at the same time.)
![Image]()
After everything is out of the motor and the old mast has been removed from the system put the reel channel back into the motor assembly, put the metal backing plate back on and secure those two screws back onto the plate.
Now put the complete assembly back into the car. Attach the drain tube, antenna feed, and power connector. Make sure everything is secure now but DONT tighten down that 10mm nut just yet!
*This next step is where it helps to have another person around to help you out.*
Have someone go inside you car and turn ON the radio.
Now take the mast and put it into the tube.
![Image]()
Have the other person shut off the radio. This may take a few tries but eventually it will snake itself back down the tube the way it should be.
![Image]()
Next (with the radio off) re-apply the black base to the antenna hole and put the metal screw down cap back on top.
![Image]()
Now with one hand lift the motor from the inside and witht he other hand hand-tighten the metal cap.
Re-secure the 10mm nut so that its nice and firm. and with the pliers tighten down the metal cap (Do Not Overtighten! 1/4 turn after it sits).
![Image]()
![Image]()
Put the interior panels back together the way they belong and re-secure the clips.
Check for smooth operation and you're done!
Any quesions please feel free to PM me
- DVPTeg26
- Tools Required:
- 10mm Wrench
- Philips Head Screwdriver
- Pliers
- Antenna Mast From Honda/Acura (39152-SM4-A03)
The problem... car off, antenna up.

Start by removing the clips that hold on the interior lining and bending/moving the interior trim out of the way to exopse the antenna motor assembly. (on 3DR models it is required that you remove the entire left side interior to obtain easier access to the motor assembly. refer to the rear seat removal article. This project can be done without removing the rear seats but its much easier when everything is out of the way).


Loosen up the 10mm nut that holds the antenna assy to the bracket. Then slide the antenna down and maneuver it out of the bracket into the trunk area. At this time disconnect the power supply connector, breather tube and antenna reception feed wire.


With the entire unit out of the car, put it on the ground with the metal plate with the two screws facing up.


Simply lift, or pry depending on the situation, the plastic channel from the motor assembly and remove the snapped/ damaged/ broken reel.
Now go back to the mast and firmly pull it out of the reception tube. (note: If after a few tugs the mast is not comming out you will need a new reception tube as well. Chances are that it is so corroded that the tube has fused itself to the metal of the mast itself! Its not a bad idea to pick up the replacement mast along with the tube at the same time.)
Now put the complete assembly back into the car. Attach the drain tube, antenna feed, and power connector. Make sure everything is secure now but DONT tighten down that 10mm nut just yet!
*This next step is where it helps to have another person around to help you out.*
Have someone go inside you car and turn ON the radio.
Now take the mast and put it into the tube.

Have the other person shut off the radio. This may take a few tries but eventually it will snake itself back down the tube the way it should be.

Next (with the radio off) re-apply the black base to the antenna hole and put the metal screw down cap back on top.

Re-secure the 10mm nut so that its nice and firm. and with the pliers tighten down the metal cap (Do Not Overtighten! 1/4 turn after it sits).
Put the interior panels back together the way they belong and re-secure the clips.
Check for smooth operation and you're done!
Any quesions please feel free to PM me
- DVPTeg26


