

A few weeks ago I posted an article on Installation of a "Shark" S2000 antenna, today's article covers the other path to go.. using the Honda OEM S2000 antenna in our Integras
I'll start off talking about this article by saying that BOTH antennas worked very very well and its a matter of ease of installation (this article) or cost (the Shark)
So with that said, let's jump right into the installation. Here's the parts needed
[*]OEM S2000 antenna ($120 at the dealer) [*]Universal rubber grommet (60 cents at Lowe's) [*]1" PVC pipe coupling (another 60 cents at Lowe's) [*]Metal Strap like used in a radio install (like this)
![Image]()
Tools we used:
[*]Drill w/ phillips head and 10 mm socket and rachet (rear seat/panel removal) [*]Utility Knife (cut rubber grommet) [*]Sharpie marker (mark PVC for cutting) [*]Dremel Tool (modify top mount and cut PVC pipe) [*]Pliers and electrical tape (home made antenna removal tool
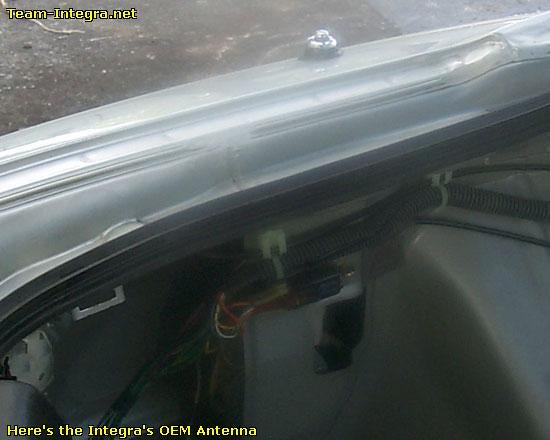
We start by removing the rear seat and driver's side panel (this article). Once that happens, here is the Integra's OEM power antenna
Note! sorry about the smudge on the first few pics, didn't notice until image review
![Image]()
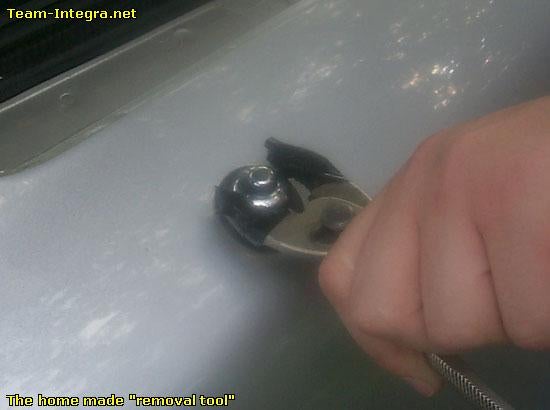
Here we use a pair of two-position pliers with the ends wrapped in electrical tape to remove the OEM retaining bolt... You only need to get this slightly loose to be able to do the rest by hand, and PLEASE BE CAREFULL!
![Image]()
Once that top retainer is out, look at the bottom of the antenna from the inside and you'll see a brass 10mm bolt that'll fully allow the power antenna to be removed (pic from other article)
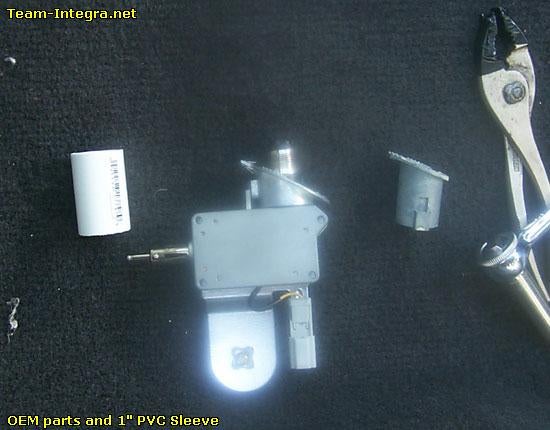
All right, pictured here from left to right is:
[*]The 1" PVC coupling [*]the S2000 antenna and its mounting collar (thing thats at the top and angled) [*]The Integra's mounting collar (just in this pic for comparison)
![Image]()
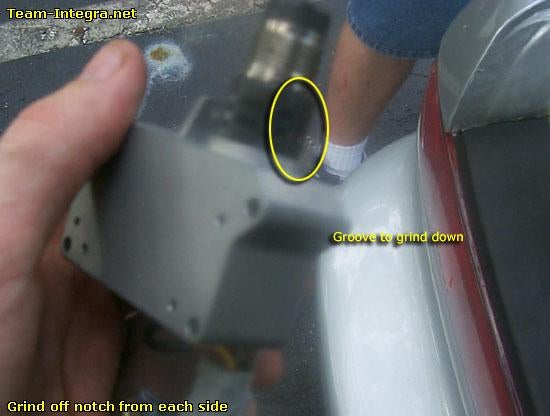
Our goal is to turn the PVC piece into a shorter version of the S2000's mounting collar as that piece won't allow the antenna to poke up high enough through the hole to allow it to be screwed down properly Before we start cutting up the PVC, we needed to remove the "notches" from the sides of the antenna (shown in circle, although blurry, sorry)
![Image]()
So by making a line in the PVC to match the angle we cut that, and then we slowly took off more and more until we had enough of the base up through the hole (sneak peak from a later pic showing what I mean). This step is all just a matter of "cut some off, test fit... repeat"
![Image]()
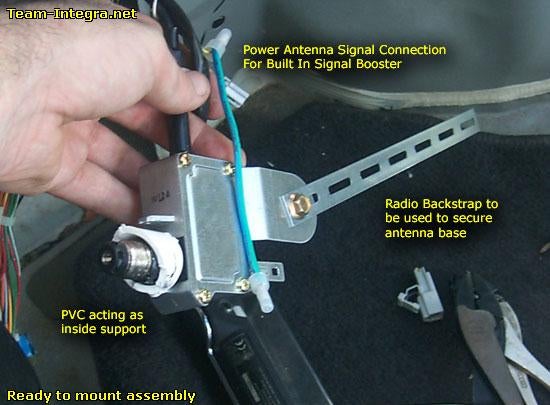
Next we prep the bottom of the antenna for mounting. Shown is the metal strap secured to the bottom, the PVC pipe cut down enough to allow proper mounting of the new retention bolt, and also hooking up of the booster power input to the car's yellow/green power antenna turn on lead (from the harness that was plugged into the Teg's power antenna)
![Image]()
Busting out the dremel tool, we also lop off the bottom part of the top/outside mounting collar
![Image]()
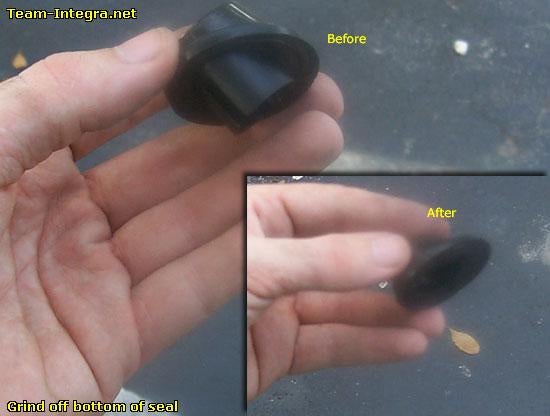
Here's where the rubber grommet from Lowe's comes into play, this little investment can go a long way to keeping water from seeping into the car. Once that's set in place, put on the top collar and tighten the top retaining bolt (not shown)
![Image]()
Once the top is in place, we supported the antenna further buy screwing the metal strap to the car
![Image]()
(Note that I also did this for the Shark Install) Little bit of toying with angles and rotating the base to get it lined up, here is the OEM S2000 antenna installed and ready to use!!
![Image]()
- MorningZ
I'll start off talking about this article by saying that BOTH antennas worked very very well and its a matter of ease of installation (this article) or cost (the Shark)
So with that said, let's jump right into the installation. Here's the parts needed
[*]OEM S2000 antenna ($120 at the dealer) [*]Universal rubber grommet (60 cents at Lowe's) [*]1" PVC pipe coupling (another 60 cents at Lowe's) [*]Metal Strap like used in a radio install (like this)

Tools we used:
[*]Drill w/ phillips head and 10 mm socket and rachet (rear seat/panel removal) [*]Utility Knife (cut rubber grommet) [*]Sharpie marker (mark PVC for cutting) [*]Dremel Tool (modify top mount and cut PVC pipe) [*]Pliers and electrical tape (home made antenna removal tool
We start by removing the rear seat and driver's side panel (this article). Once that happens, here is the Integra's OEM power antenna
Note! sorry about the smudge on the first few pics, didn't notice until image review
Once that top retainer is out, look at the bottom of the antenna from the inside and you'll see a brass 10mm bolt that'll fully allow the power antenna to be removed (pic from other article)
All right, pictured here from left to right is:
[*]The 1" PVC coupling [*]the S2000 antenna and its mounting collar (thing thats at the top and angled) [*]The Integra's mounting collar (just in this pic for comparison)
Our goal is to turn the PVC piece into a shorter version of the S2000's mounting collar as that piece won't allow the antenna to poke up high enough through the hole to allow it to be screwed down properly Before we start cutting up the PVC, we needed to remove the "notches" from the sides of the antenna (shown in circle, although blurry, sorry)
So by making a line in the PVC to match the angle we cut that, and then we slowly took off more and more until we had enough of the base up through the hole (sneak peak from a later pic showing what I mean). This step is all just a matter of "cut some off, test fit... repeat"

Busting out the dremel tool, we also lop off the bottom part of the top/outside mounting collar

Once the top is in place, we supported the antenna further buy screwing the metal strap to the car

(Note that I also did this for the Shark Install) Little bit of toying with angles and rotating the base to get it lined up, here is the OEM S2000 antenna installed and ready to use!!

- MorningZ


